9ijadrop.blogspot.com

  • This is default featured slide 1 title

    Go to Blogger edit html and find these sentences.Now replace these sentences with your own descriptions.This theme is Bloggerized by Lasantha Bandara - Premiumbloggertemplates.com.

  • This is default featured slide 2 title

    Go to Blogger edit html and find these sentences.Now replace these sentences with your own descriptions.This theme is Bloggerized by Lasantha Bandara - Premiumbloggertemplates.com.

  • This is default featured slide 3 title

    Go to Blogger edit html and find these sentences.Now replace these sentences with your own descriptions.This theme is Bloggerized by Lasantha Bandara - Premiumbloggertemplates.com.

  • This is default featured slide 4 title

    Go to Blogger edit html and find these sentences.Now replace these sentences with your own descriptions.This theme is Bloggerized by Lasantha Bandara - Premiumbloggertemplates.com.

  • This is default featured slide 5 title

    Go to Blogger edit html and find these sentences.Now replace these sentences with your own descriptions.This theme is Bloggerized by Lasantha Bandara - Premiumbloggertemplates.com.

How To Connect Your Smartphone To A Television


To connect a tablet or Smartphone to a television, you can make use of a Micro-HDMI cable (only if supported) or an MHL/Slimport (through Micro-USB), or cast your screen wirelessly using Chromecast or Miracast. In this article, we will look at the different options for displaying your tablet or phone's screen on the television. Also, there is another way to share your Smartphone screen while on a call.

Smartphones and tablets are ideal for individual users - long battery life, lightweight, and with sharp, bright screens which make light work of everything from reviewing phones to watching films.
Bigger crowds will demand bigger screens: so, here is how you can connect your Smartphone or tablet to your television without drowning in a river of cables or emptying your bank account.
We live in the content age, thanks to streaming services like Amazon Prime Video and Netflix. However, this is not so good when you're sharing the experience with several people.
Your television is ideal for this and we will explore the options as regards displaying your mobile content on a big screen. Also, we will be looking at the services which will allow you to share your videos, photo and subscriptions on the bigger screen - and those which won't.
Connect Smartphone to TV Wirelessly - Miracast
The amazing feeling associated with displaying video directly from your Smartphone to a TV is unbeatable. The beautiful thing about Smartphone is that there are several ways to get this done. A wireless standard known as Miracast creates an ad-hoc network between 2 devices, typically your Smartphone and a set-top box that supports Miracast

Devices that Support Chromecast Mirroring
Chromecast mirroring used to be supported by only a few devices, but now all Android phones running version 4.4.2 or higher are able to support this Cast Screen feature.
However, there is a list of Android phones which have been tested to perform perfectly for Android Screencast.
How to connect Smartphone to TV - HDMI
High Definition Multimedia Interface (HDMI) is the most popular interface standard. If your television was purchased within the last decade, it should have an HDMI port, just like almost every games console, set-top box and a good number of video and still, cameras do.
The advantage of HDMI, asides its ubiquity (implying that it is cheap), is that it can accommodate HD audio and video simultaneously, allowing the connection of devices without bothering about watching a movie in full High Definition but having to use your Smartphone’s small speakers. An HDMI port is an advantage which most Android phones have over Apple's devices.
There are three different sizes of HDMI plugs. Regular HDMI is the full-sized ports you will find on devices that do not have issues with space: think games consoles, laptops and TVs. The sockets you will likely find on phones and tablets will either be Mini HDMI or Micro HDMI. Of these 3, Micro HDMI is the smallest.
Regardless of the kind of port your Smartphone has, getting it connected to an HDMI socket will not cost you a fortune: prepare to spend less than $10 (less than $5 for some) for an HDMI to Micro- or Mini-HDMI cable.
Several kinds of Smartphones have either HDMI or its smaller variants. It is the simplest approach.
You are not limited to purchasing a Smartphone with an HDMI port to get it connected to your television, though.
How to connect Smartphone to TV - Slimport or MHL
HDMI is simple to comprehend: it is a port which does only one thing, after all. The con is that not every tablet has an HDMI port, and very few Smartphones do. The great news is that there is a pair of largely-supported standards that have emerged which allow owners of Smartphones to connect to external devices with the use of their micro USB port.
These standards are known as Mobile High Definition Link (MHL) and the latest Slimport. They both look similar, which obviously implies that they make use of the micro USB port on a Smartphone to deliver videos.

Like HDMI, MHL and Slimport support both audio and video, with up to 8 available channels of surround sounds. Both usually require breakout boxes (this is a little dongle between your TV and Smartphone which converts the signal from the device and makes it compatible with HDMI.

Prepare to spend between $5 and $20 for either an MHL or Slimport signal converter. It is a little more costly than using a Smartphone that has an HDMI output, but MHS specifically is supported by a large range of tablet and phone manufacturers.
MHL has gone through several versions: we are currently on the third version, which costs slightly more but improves the maximum resolution to about 4k. This is similar to Slimport and implies that both standards provide very similar technical specifications.
One advantage of MHL is that it has support from several Television manufacturers: check on the back of your television to see if there is an MHL logo above the HDMI port. If it does, an HDMI to micro-USB cable can be used to connect them - the HDMI cable passes power to your Smartphone or tablet, which means there will be no need for extra cables or adaptors. That's a plus!
If your television does not support MHL, or you've got a SlimPort device, you will need to purchase an adaptor. Users of Slimport should expect to spend about $15, while users of MHL may pay a bit less. If you are using MHL, you may likely require an external power source: the latest version of MHL can draw about ten Watts from a host device.
You do not need an external power supply with Slimport (it draws a little quantity of power from the device), making it less cluttered to set up. Both devices require the Smartphone’s screen to be on, so breakout boxes usually come with a micro-USB port for a charger to be connected.
Support for Slimport and MHL varies largely. With 3 different MHL versions available plus Slimport, you will need to check the specs of your device before purchasing an adaptor.
Share:

10YearsChallenge: See Girl Born Prematurely Without Sucking Her Mother's Breast


A litle girl, Miracle of 6 months old born prematurely without sucking her mother's breast that weighed 0.7KG, was in the incubator, survived many blood transfusion.
She joins the trend of "10 Years Challenge" as she shares then vs now photos.
As shared with caption...
#10YEARS )CHALLENGE: 10 years ago, Miracle was BORN PREMATURELY, 6 MONTHS, WEIGHED 0.7 KG, WAS IN THE INCUBATOR FOR THREE MONTHS. NEVER BATH WITH WATER BUT WAS CLEANED WITH ONLY OLIVE OIL. SHE NEVER SUCKED HER MOTHER'S BREAST, SURVIVED MANY BLOOD TRANSFUSION. MANY NURSES GAVE UP HOPE ON HER BUT GOD HELD AND KEPT HER UNTIL SHE TRIUMPHED.


Share:

Food That can Lower the Risk of Having Cancer


What you eat can affect many areas of your health, including the risk of developing strong disease such as diabetes, cancer and even heart disease.
There are many foods which contain different compounds that can help in reducing the growth of cancer; studies shown that higher intake of some certain foods can help in lowering the risk of some diseases naturally.
Below are some of the foods that can lower the risk of having a cancer:
  1. Carrots
Carrots (Daucus carota) is a root vegetable which serve as a good source of fibre, potassium and vitamin k.Studies have shown that eating more carrots help in reducing the risk of certain types of cancer, therefore it is advisable to include carrots in our daily diet as a healthy delicious dish or snacks. Carrot can be eaten more than one time per week to reduce the risk of having cancer.
  1. Broccoli
Broccoli is an edible green plant from the family of cabbage, its large flowering head is eaten as vegetable. The presence of phytochemicals, antioxidants glucoraphanin and indole-3-3carbinol in broccoli has been proven to decrease the risk of some cancer such as breast cancer, cervical cancer, gastric and even prostate cancer.
  1. Tomatoes
Lycopene is an antioxidant that causes the red colour in tomatoes. Lycopene is a powerful antioxidant for preventing the formation of some certain cancers. They also lower the risk of heart disease.
  1. Raw Garlic
Garlic is from the family of allium. Garlic contains strong antioxidants like allicin, that has been proven to boost immunity, cholesterol levels, lowers blood pressure, improves brain function and act as a natural detoxifier.
  1. Strawberries
Researchers found that strawberries reduce the growth of cancer cells, lower inflammation, prevent memory loss, help to burn fats stored in the body and protect your body from heart disease. So there are more reason for you to try this unique fruit out.
  1. Green tea
Catechins are type of phenolic compound found in green tea which makes it a good cancer fighter. The catechin present in green tea is believed to be more energetic than vitamin C in fighting free radical damage; green tea inhibits the development of cancer cells.
Green tea is recommended daily by expert as a natural cancer preventative.


Share:

What is Life? click to watch

Share:

How To Disable Write Protection In SD Card Or Pen Drive?


here are times when you feel frustrated because Windows isn’t able to copy any file or folder due to some write protection enabled in your SD card or pen drive. However, Windows can access the content already stored on the storage media without any issue.
Most people consider write protection as a problem but it is actually meant to protect your SD card or pen drive from unauthorized write operations. Sometimes, this advantage itself becomes the cause of heartbreak and irritation on your face. In this article, I’m going tell you about some methods which will help you disable write protection on your SD card or pen drive.
Check out these methods:

Slide the switch to disable write protection:

SD cards and some pen drives have a switch which is used to enable or disable write protection in it. You might have changed the position of that slider switch. In the case of a micro SD card, put it in an adapter and then try to slide the switch.

Use the antivirus

You can scan your write protected SD card or pen drive using some antivirus software. There are chances that some malware having evil intentions for your SD card.

You might be low on space

It is not that every time you have a faulty hardware or some malware is conspiring against your SD card. It might be possible that the file you’re trying to copy has the size larger than the available space on your SD card or pen drive. Go to the Properties of your pen drive or SD card to check whether it has enough space or not.
Also, the issue may be with specifically that file. The file may be set to Read-only. You can remove it by going into the Properties of that file and unchecking the Read-only check box.

Disable write protection using command line (CMD)

You might want to go one step further if the above methods aren’t helping you getting the deal. Use Windows Command Prompt to disable write protection in SD card or pen drive.
Here are the steps:
  1. Connect your write protected SD card to your computer.
  2. Right Click on Start. Click Command Prompt (Admin). Click Yesin the UAC message.
  3. Type diskpart and hit Enter.
  4. Type list disk and hit Enter. Here, you’ll be able to see a list of storage media connected to your computer like your internal hard drive, SSD, pen drive, or SD card via an adapter.
  5. Type select disk <number of your disk>. Example, select disk 1in my case. Make sure you enter the number correctly and don’t end up changing the attributes of your internal hard drive or any other storage media.
  6. Type attributes disk clear readonly and press Enter.
  7. Type exit and press Enter to get out of the diskpart utility. Type exit and press Enter again to get out of the command line.
Now you’re done with disabling write protection in your pen drive or SD card. Windows will be able to copy files and folders to your SD card.

Disable Write Protection by formatting the SD card or pen drive

If the command line methods don’t work and you can format the SD card and get rid of write protection. Here are the steps:
  1. Connect the SD card or Pen drive to your computer.
  2. Open My Computer/This PC.
  3. Right Click on your SD card/pen drive and click Format in the drop-down menu.
  4. Click Restore device defaults in the next window.
  5. Click Start.
  6. Click Ok the warning message.
The format process will take a few moments. After this, you’ll be able to use your SD card normally.
Share:

12 Things to Do Before Applying for Google AdSense + FREE Bonus Checklist

So, you want to apply for Adsense to make some money from your blog and enjoy the life you always dream of?
Who does not anyway? That’s the dream of every blogger to get AdSense approved.
But, wait..
I’ve to tell you something.
That’s not easy. Google AdSense is very strict when it comes to approving new application. Everyone is trying to trick AdSense to get approved so they have made the process very hard.
Don’t worry. You’re not alone.
In this article, I’m going to share with you everything that you need to do before applying for Google AdSense program to actually get approved.
Some common questions that you may have about Google AdSense are…
How to apply for Google AdSense?
Does my blog qualify for AdSense or not?
Am I eligible to apply for Google AdSense?
What are Google AdSense requirements?
Why Google AdSense rejected my application?
What to do if Google AdSense reject my application?
This post is going to answer all your questions in detail. It’s over 3000+ words so grab a cup of coffee.. ;)

WHY GOOGLE ADSENSE IS SO POPULAR?

Google AdSense is one of the oldest networks to offer ad publishing and works at Pay Per Click system.
When it comes to the legitimacy of Google AdSense, it speaks for itself. Google AdSense have thousands and thousands of satisfied customers and publishers. AdSense pays on time, every time.
One more reason for choosing Google AdSense is that we can earn huge amounts of money if we do our work in right way. There are many bloggers who are making a complete living from their blogs and Google AdSense.
Therefore, Google AdSense should be the number one choice among all the other available networks.
It’s paying rates are better than all of other networks so that’s the biggest reason it is so popular among bloggers.
But since everybody is running behind them, they have made the approval system very strict. You make little mistakes and get disapproved every time. Here are few reasons why Google will reject your AdSense application.

COMMON ADSENSE REJECTION REASONS

Here are the most common rejection reasons and Google AdSense requirements that you should keep in mind before we get into details.

1.  Insufficient content / Unacceptable site content

Your website doesn’t have enough text on for Google specialists to review.
Google gives a lot of value and attention to the content of the blog before accepting it. If the content is poorly written and has grammatical mistakes Google will reject the blog right away.
Not only the content needs to be grammatically correct, it must be unique and has to provide value to the users and readers of the blog. So the number one reason is the poorly written content on your blog.

2. Page Type / Design of your blog

What will you do if you land a page with full bright yellow background with white text on it, having huge buttons all over the place?
Yes, you’ll never visit that website again .
Blogs which are poorly designed and are hard for the visitors to understand gets rejected by Google AdSense. You must have a good and neat design which comforts the eye and is beautiful in the look.

3. No Privacy Policy, About Us or Contact Us page

There are some pages which you must have before applying to Google AdSense if you want to get accepted.
These are about us, privacy policy and contact us pages. These pages give the impression that you are a professional and that you are working according to the Google policies. Keep in mind that having a privacy page is also one of the requirements for Google AdSense.

4. Site Does Not Comply With Google AdSense Policies

No rich, unique and meaningful content, no organic traffic, pages with little to no original content or bad user experience through clear navigation and organization.
Your website may be the one that drives traffic through illegal sources, sites with excessive keywords or poorly coded design are usually rejected.
So you need a complete guidance and list of things that you need to do before applying for Google AdSense.

THINGS TO DO BEFORE APPLYING FOR ADSENSE

1. Write High-Quality Content:

The #1 thing you need to do before applying for Google AdSenseis to write high-quality content. This is very important thing which you can’t ignore at any cost. I mean it!
Google loves the blog who are providing high-quality content and their visitors are enjoying it. Keep in mind that your application will be reviewed by humans and you have to impress them to get approved by AdSense.
A high-quality content…
  • is unique and original
  • with proper headings and bullet lists
  • free from grammar and spelling mistakes
  • is long enough
  • useful and informative
Helpful resources:
  • What is Quality Content?
  • How to Produce High Quality Written Content

2. Create Privacy Page for Your Blog:

One of the common mistakes that most new bloggers. Even though there are people out there who say that having a privacy policy for a blog doesn’t make sense but they are wrong!
The first thing you will need to apply for Google AdSense and get approval is the privacy policy of your blog or website. If you don’t have it you cannot get approval simple is that.
Why is it important?
It’s requirement of AdSense and secondly, this privacy policy means you are not a scam and gives the sense of a serious business. Google will check the rest of the conditions only if you have this policy.
A privacy actually describes to your readers about what they will get on your blog , what they should do and what they should not. So obviously there is nothing bad in having a privacy policy. While it can affect somehow on your AdSense approval, you must give it a try.
You can write it yourself or find Privacy Policy Generators online (You don’t need a lawyer anyway).
Helpful guide:
  • Create a Simple Privacy Policy for Your Blog (Example Included)

3. Create About Page:

Like privacy policy, you must have an about page so that you can get approved. This also shows that there is a real person behind the blog.
An About page has a major role and importance even if you don’t want to apply for AdSense. But when it comes to AdSense, they are about zero chances of getting approved if you are not showing this page.
About page simply describe you and your blog . This will not only help you establish a relationship with readers but it will also make them trust you.

4. Setup A Contact Us Page:

It’s quite obvious that everyone has his/her own opinion.
What one of your readers likes may be bothering someone else. Then it is better to give them an opportunity to speak up to you and tell how they feel about your blog, what they want to be edited , what they liked or hated.
Create a contact page, if possible add your email that you are going to apply for Google AdSense. If possible do get some professional email address like ammar@allbloggingtips.com and your social profile links too.
By creating this you are telling Google that we care for our customers, visitors and we are ready to help them. They can contact us anytime.
It will also show the Google AdSense Team that is viewing your site that you actually care about your readers and not only the money and AdSense.
Check out my contact page to get some idea.
One important step: Google AdSense mention in their rejection email that your website should have a clear navigation menu to help your readers find your pages and access the content before you think about applying again for AdSense.
So, what you’ve to do is to work on your menu by adding all important categories and pages i.e about us, contact us and privacy policy to help your readers easily find the content that they are looking for. The more you care about improving your visitors experience the higher chances will be to get approved by AdSense.
Here’s an example to illustrate this point.
add important pages to adsense

5. Verify Your Name and Email:

When you apply don’t forget to put your name and email address in some easily visible area like about and contact pages. It will confirm to Google AdSense team that it is the same person who applied for AdSense and not some spam, crappy bots.
This will speed up the verification process and within no time, you’ll be able to enjoy fully approved AdSense account.

6. Have Some Good Number Of Posts:

What should be the minimum number of posts before applying for Google AdSense? There is no confirmed answer.
Not even one.
Because I have seen very established blogs with 300+ posts and their owner telling me that Google AdSense is rejecting them while somewhere bloggers with few posts or even less than 10 are enjoying making money with AdSense.
Exactly, what I said that there is no actual answer. However, we can always predict things.
According to my experience, the best time to apply for AdSense account is when you have at least 20 good quality posts. Your blog posts length should be at least 600+ words with quality content.
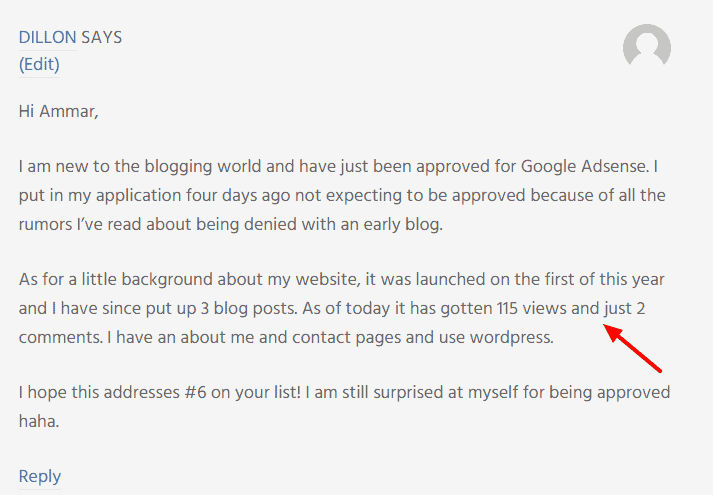
Dillon got his AdSense account approved with just 3 posts, 115 views, and 2 comments. Isn’t that great?
I visited his blog and noticed these things that actually matters to get Adsense approved.
  • Simple and clean design
  • Easy to navigate blog
  • Unique niche
  • Detail content
  • No “unwanted” widgets
minimum requirement for posts

7. Make Sure You’re 18+

This is the mistake that new bloggers are making who are less than 18. They write incorrect age and get into trouble.
Use your correct date of birth and age while applying for Google AdSense account.
Because Google AdSense is not for people who are under 18. Some people realize this problem after being disproved a few times without any legitimate reason.
So I advise you to be accurate while typing your age.

8. Improve Your Blog Design:

As mentioned earlier, you blog design matters a lot. It should be professional and not like a messy photo gallery. A clean, professional and fast-loading design is appreciated by Google.
When you visit a website what’s the first thing you look for? It’s blog design.
You’ve to build a good first impression on your blog readers to engage them.
Your blog design is the biggest thing after content. This represents your expertise, experience, and professionalism. It should have following features:
  • Simple and professional
  • Easy to navigate
  • Proper menus
  • No useless items in sidebar or footer
  • Search engine friendly
  • Fast loading
So be careful because anything can kill your chances of getting approved by AdSense.
There are thousands of websites who provide free professional looking themes for your blog. All you need to do is to search for them.
If you’re on WordPress self-hosted blog then I recommend getting a premium theme from MyThemeShop.
And if you are still using blogspot then there are many great websites where you can find free professional looking blogger templates for your blog.
Check out my post on the reasons to invest more money on your blog.

9. Check Your Content Type:

Be careful with what type of content you are publishing. Because it is something that truly matters.
Here are some common content types that are not accepted by AdSense.
    • Pornography/Adult materials
    • Pirated Content
    • Hacking or Cracking Tutorials
    • Illegal Drugs/Paraphernalia
    • Any Other Illegal Stuff
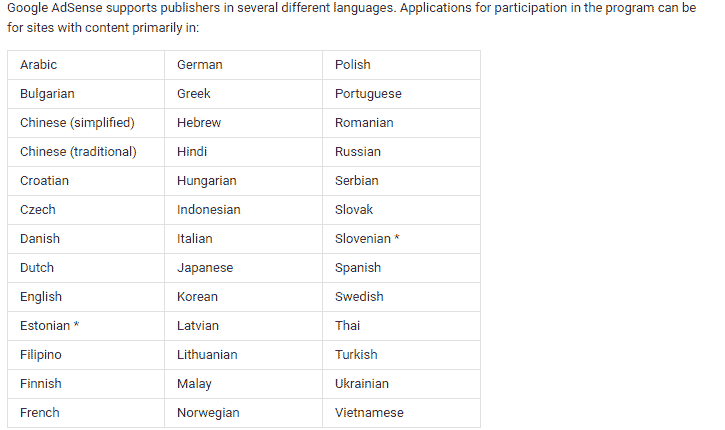
    • There are few languages that are supported by AdSense so make sure your blog language is in the list of these.
AdSense supported languages
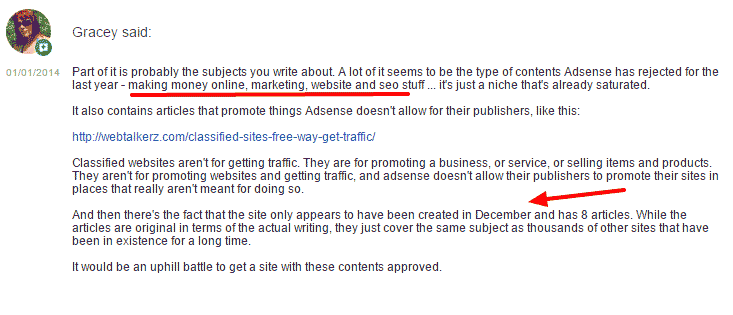
Google AdSense team mentioned in one of their forum posts that they stopped accepting niches that are already saturated i.e making money, marketing, website and SEO stuff. 
Please-review-my-site-for-Google-Adsense---Google-Product-Forums
If you already have written about these content that AdSense doesn’t support, you can either stop dreaming about AdSense or get rid of these content.

10. Use Top Level Domain:

Google has made changes to their policies. If you have a blog with blogspot and the domain is yourblog.blogspot.com then chances are you will get approved quickly.
But you will not be able to use that on any other domain like .com. You’ll have to submit the request to upgrade your AdSense account.
As for today, you must have your own unique domain that specifies your blog. If you don’t have one yet, stop dreaming about getting approved with sub domains and go buy a Top Level Domain. It will cost anywhere from $10-$15/year. You can buy the domain from Godaddy or Namecheap.
The best domain is the one with .com extension. Choose a short, unique and easy to remember domain that is related to your blog niche.
Another important thing about the domain is its age. Because for some of the Asian countries like India, AdSense has placed domain age restriction. They don’t accept any sites which are less than 6 months old.
There are many AdSense stories that I read on many forums that some people got approved for few weeks old blog and other got rejected for the blog that is even more than 6 months old. So age doesn’t really matter when you have a high-quality blog that’s focus more on helping your visitors.
If you’ve a website that is less than 6 months old then you can still consider applying for AdSense.
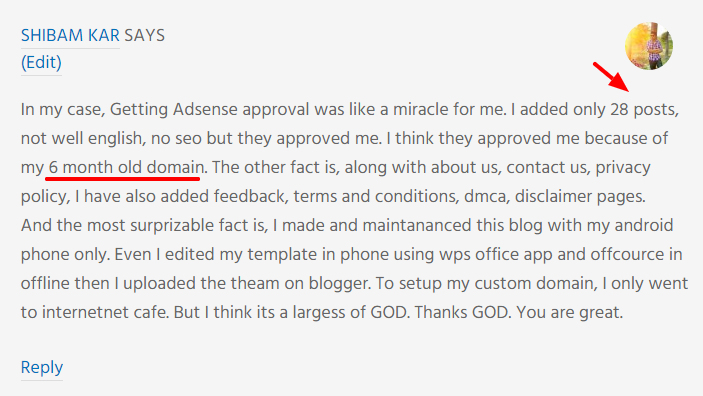
Shibam got accepted by Google AdSense with 28 posts and a 6 months old blog. He managed his blog from mobile only.
shibam adsense approved

11. Remove Other Ad Networks:

If you have any other ads placed like Chitika, Infolinks, Clicksor or anything, it’s time to drop them off.
Make your blog free from ads.
Even Google AdSense allows you to use other ad networks along with them, it’s better to remove the ads before applying and don’t put them back until you get a reply from AdSense team which usually takes anywhere from few days to weeks.
So, before submitting your application for Google AdSense make sure to remove all the ads on your blog from any other network.

12. Check Your Traffic Sources:

Google hates the sites that are getting paid traffic and mostly penalizes them so there is not a damn chance of getting approved by AdSense for a site that is getting paid traffic. You can bring traffic from search engines or any other way you want but if you want to earn via Google AdSense the right way, paid traffic is not a solution.
Also, note,that Google does not accept site which gets traffic from illegal sources. So focus on getting traffic from legal sources like social media, search engines, and related blogs.
Further Reading:
  • 7 Strategies I Use To Increase My Blog Traffic (I Bet You Can Too!)
  • How to Get Traffic to A New Blog?

WHAT TO DO IF YOUR APPLICATION IS REJECTED?

Okay, so you had done trying everything you could to get approved by AdSense.
But, AdSense is still not getting approved.
Well, It’s not the end of the world! ;)
CONCLUSION:
To sum up, getting an AdSense approved is not really hard if you have a quality website that is focused more on high-quality content, optimized for search engines, uses a great design and with the good number of visitors. Because that’s what Google wants from its every publisher.
Make sure to do these things before applying for Google AdSense. I guess these are not too hard. Don’t be sad if Google AdSense doesn’t approve your blog. There are many other ways to make money online without AdSense.
Hope for the best.
One more thing, don’t reply too much on AdSense. Try to make money through your blog from other business models. Ads network will not give you much as other income methods like affiliate marketing and selling your own product.
Now here’s what I want YOU to do.
  • Click on social sharing buttons below and share this post with your friends, I’m sure they’ll love it!
  • Comment below and let me know your story about getting AdSense approved. If you have any questions feel free to ask.

Enjoyed reading? Share with your friends!

Share:

A Nigerian man has taken to social media to reveal his heartbreak after finding out his parents hid his twin brother from him since childbirth. According to Emmanuel Rowland, he thought he was the only child of his parents before he was shocked to find out last year that he had a twin brother which was given to his father after birth (his parents are separated). The young man who reunited with his other half after 21 years – now calls him the best twin brother in the world.
Read his story below.
I have been in tears have been in pains. My mummy why do you have to hide my twin from me? In 2016, one of my aunts said “Emmanuel, you have a twin”. Just like a joke I took it, I didn’t ask for that. Since 1997, I grew up with no siblings no sister no brother, she doesn’t even know how hard it was for me growing alone mum why Meanwhile I had 1 hidden from me chai, Nigerians are wicked oh GOD.
Last year 2018 August 8 I received a call from dad, though we ain’t close so we don’t communicate due to mummy and daddy issues. We spoke for an hour explaining things to me how they got separated and how she took me and gave my brother to dad. This is so sad that I have lived without a brother, not just a brother a twin my twin. I wish they were in my shoes, ‘they for know say it wasn’t easy.’ I needed someone to be there for me, stand by me laugh with me and joke/cry with me. Thanks to God, I went to California, we did the introduction and now we the best twin bro in the world.”
Share:

About

Popular Posts

You are at the right place, Welcome...

Contact Form

Name

Email *

Message *

Followers

Search This Blog

Mobile Logo

Mobile Logo
image

Pages

Pages

Full-Width Version

false

Pages - Menu

Popular posts

Labels

Recent Posts

Pages

Recent Posts